Help Resources
This Help Resource page has been created to help users navigate the Jmol Exploration Creator website. If this is your first time using the Jmol Exploration Creator, we suggest exploring the content below. If you are not familiar with Jmol or Jmol commands, visit our Interactive Jmol Training Guide to learn what Jmol is and how to use it.
The Design Environment
The Design Environment for the Jmol Exploration Creator is where you will spend the majority of your time while creating a Jmol Exploration. The main navigation includes six buttons or "steps", which can be accessed in any order and at any time. You may find yourself returning to previous steps to refine your content or designs.
Below the main navigation is the content area where you will be entering information and selecting design options.

Step 1: Choosing an Overall Layout
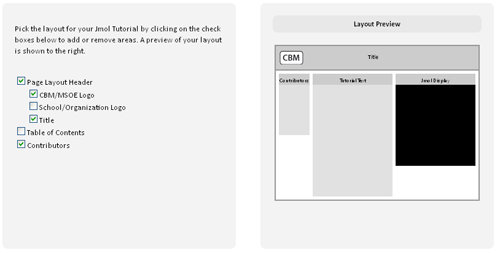
A sample layout created using the layout check boxes
The first step is to pick the layout for your Jmol Exploration by clicking on the check boxes to add or remove areas. A preview of your layout is shown to the right of the check boxes so that you can see the affect of each checkbox on your final layout.
Note that the table of contents is dynamically created based on the Titles and Subtitles added to the Exploration.
Step 2: Choosing a Color Scheme
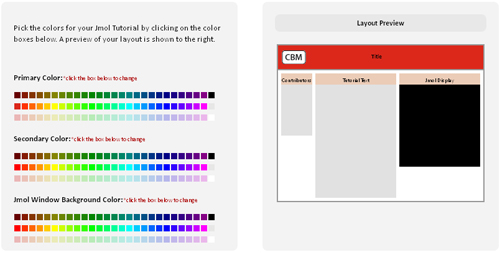
A sample color scheme created using the color choices
The second step is to pick the colors for your Jmol Exploration by clicking on the color boxes. A preview of your layout is shown to the right of the color choices so that you can see the affect of each color on your final layout.
Users often try to match the colors of their school or even of the molecules they want to display, however be careful not to choose colors that are too bright, dramatic or clashing.
Step 3: Adding the General Content
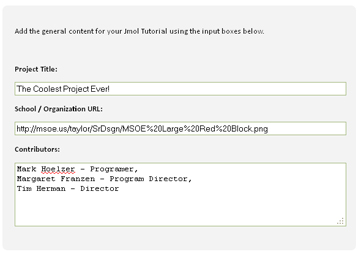
A sample set of general content
The third step is to enter the general page information, including the Title of the project, the URL for the school or organization logo image, and the list of Contributors.
The school or organization logo, like all of the images you may use in your Jmol Exploration, will be defined by its URL. A URL is the reference to a resource on the Internet, such as an image or piece of media. If you have already found an image online that you would like to use for your logo, simply right click on it and select "Copy Image Location" from the menu. Paste this image location (URL) into the correct text box on the General Content page of the Jmol Exploration Creator.
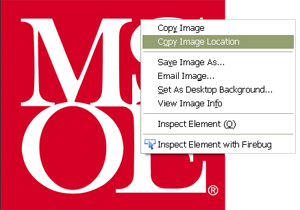
If you have not already found an image, we suggest using Google's Image Search to find the best image possible. Start by entering the type of image you are looking for. Once you have found the best image possible, click the "View Image" button. Finally, right click on the image and select "Copy Image Location" from the menu. Paste this image location (URL) into the correct text box on the General Content page of the Jmol Exploration Creator.

Step 4: Adding the Main Content
The fourth step is to enter the main content to your Exploration. The layout will automatically resize to maximize your screen space and includes three main areas:
- The Jmol Display - This is where your molecule will be displayed using the molecular visualization program Jmol. Initially, no molecule is displayed in this space.
- The Content Area - This is where the content elements you add to your Exploration will appear. Initially, no content is displayed in this space.
- The Content Tools - This is where all of the content element types are listed. To add an element, simply click on the type you would like from this menu.
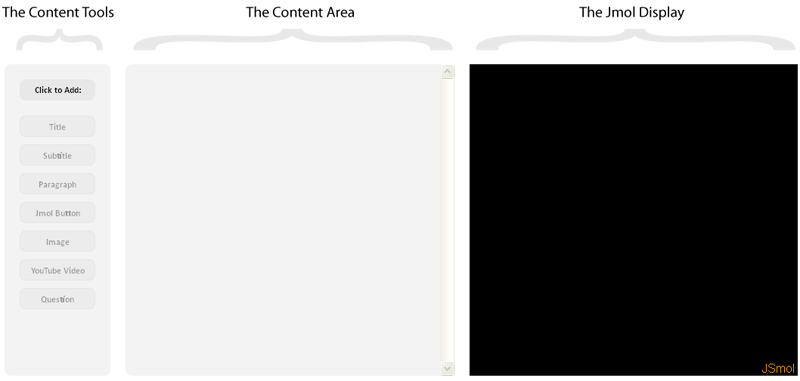
When a content element from the Content Tools menu is clicked on, it will be added to the Content Area. When an element is first added, it will be actively selected and can be edited, including moving it up, moving it down, deleting it or adding information to it.
At any time, previously added content elements can be actively selected by clicking on them. This will allow you to review previously added information and make edits to content elements added earlier.
Adding a Title

A Sample Title
The Title content element is relatively straight forward with only a single area to add information. When your Jmol Exploration is exported, this element will display a large font size title using the primary color you have chosen. If you have included a table of contents in your Exploration layout, it will also add an item to your table of contents.
Adding a Subtitle

A Sample Subtitle
The Subtitle content element is relatively straight forward with only a single area to add information. When your Jmol Exploration is exported, this element will display a medium font size subtitle using the secondary color you have chosen. If you have included a table of contents in your Exploration layout, it will also add an item to your table of contents.
Adding a Paragraph
The Paragraph content element allows you to create styled blocks of text. For a basic paragraph, simply type the content you want into the main text area.
You can also include styled text in your paragraph, such as bold, italic, colored, superscript or subscript text. To do this, type the text you would like to have styled. Then highlight it using your mouse. Finally, click on the type of styling that you would like to apply to the highlighted text. Below the main text area you will see a preview of how your formatted and styled text will appear in your final exported Jmol Exploration.
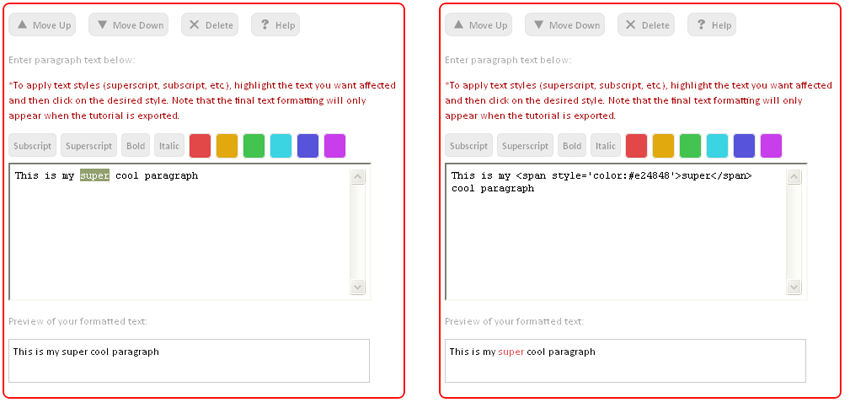
Note that all of the styled text in a paragraph element is created using what are called "HTML Tags". For each piece of styled text, there is an opening HTML Tag and a closing HTML Tag (samples of each type of style are shown below). To remove a text style from your paragraph, simply delete the opening and closing HTML Tags from your paragraph text.
| Subscript Text | <sub>Subscript Text</sub> |
| Superscript Text | <sup>Superscript Text</sup> |
| Bold Text | <strong>Bold Text</strong\> |
| Italic Text | <i>Italic Text</i> |
| Color Text | <span style='color:#e24848'>Color Text</span> |
Also note, if you need to use special characters such as symbols or Greek letters, you can add them using the HTML codes shown on This Website. For example, adding a Greek Delta symbol would require the text "Δ".
Adding a Jmol Button
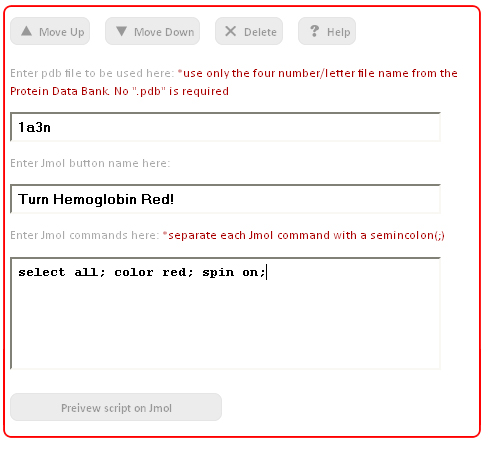
A Sample Jmol Button
The Jmol Button content element allows you to create custom buttons that will load and display a molecular structure. There are three pieces of information you need for a Jmol Button to work properly:
- The PDB File Identifier - The 3D locations of all of the atoms in a molecular structure are stored in what is called a Protein Databank File (.pdb). These 3D coordinate files can be found at the https://www.pdb.org/ website. Every molecule available from the Protein Databank has a specific four character long alpha-numeric identifier. This unique identifier will need to be added to the first text area.
Note:If you want to use a SMILES Sequence to load a small molecule, you can use a small protein PDB ID as a temporary placeholder - for example "3NIR" - and then use the "load$" command in the Jmol command box.For example, if you wanted to load glucose, you would use "3NIR" as your PDB ID and then use "load$C([C@@H]1[C@H]([C@@H]([C@H]([C@H](O1)O)O)O)O)O" as your first command in the Jmol command box.
- The Button Name - This is simply the text that will be displayed on the button in the final exported Exploration.
- The Jmol Commands - This is where you will add all of the Jmol Commands that you want to run when the button is pushed. Note that all commands must be separated by semicolons. After you have entered all of your commands, you can preview the button using the "Preview Script In Jmol" button at the bottom of the content element.
If you are not familiar with Jmol or Jmol commands, visit our Interactive Jmol Training Guides for an interactive video-guided introduction to what Jmol is and how to use it.
Adding an Image
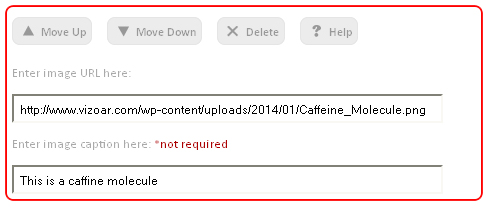
A sample image
The Image content element allows you embed an image into your Exploration and only requires the URL of the image to be entered in the first text area. A second optional text area allows you to add a short caption for the image.
Any image you use in your Jmol Exploration will be defined by its URL. A URL is the reference to a resource on the Internet, such as an image or piece of media. If you have already found an image online that you would like to use, simply right click on it and select "Copy Image Location" from the menu. Paste this image location (URL) into the correct text box on the image element.

If you have not already found an image, we suggest using Google's Image Search to find the best image possible. Start by entering the type of image you are looking for. Once you have found the best image possible, click the "View Image" button. Finally, right click on the image and select "Copy Image Location" from the menu. Paste this image location (URL) into the correct text box on the image element.

Adding a YouTube Video
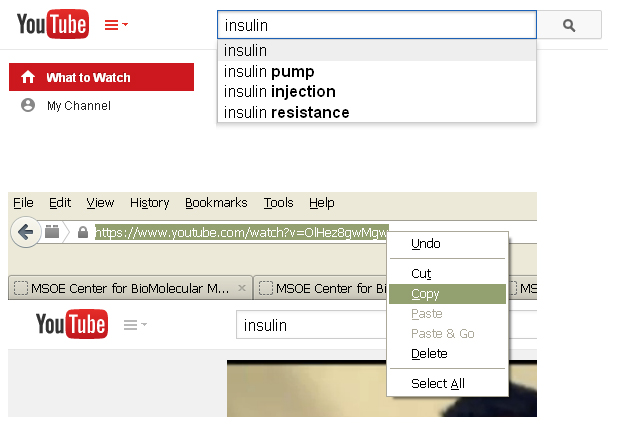
The Video content element allows you embed a YouTube into your Exploration and only requires the URL of the video to be entered in the first text area. A second optional text area allows you to add a short caption for the video.
A Youtube video you use in your Jmol Exploration will be defined by its URL. A URL is the reference to a resource on the Internet, such as an image or piece of media. To get the URL for a YouTube video, start by searching for the video using the YouTube search bar at www.youtube.com. Click on the video you want to use and then copy the URL from the top of your browser window. Paste this video location (URL) into the correct text box on the video element.
Adding a Question
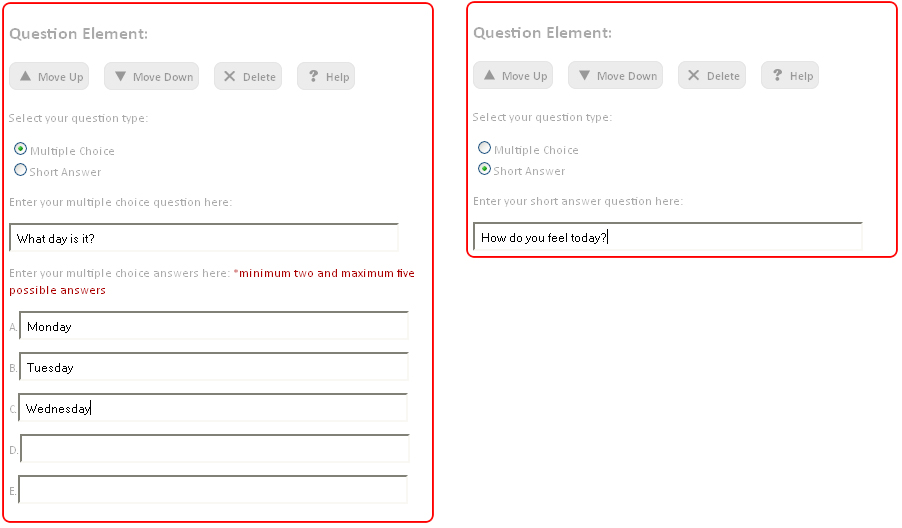
The Question content element allows you embed either a short answer or multiple choice question into your Exploration. Begin by choosing either "Multiple Choice" or "Short Answer". Then add the information into the remaining forms such as what question you want to ask and what answer options the users will be given. Note that you can have between two and five possible answers for multiple choice questions, and are not required to have all five answer text boxes filled.
When exported, your Jmol Exploration will have an automatically added button with the text "Save/Export Your Answers to the Questions in This Jmol Exploration" located at the very end of the content area. This button will allow users to view all of the answers to the embedded questions in a new window or tab. They can print or save these answers for future reference.

Previewing Your Exploration
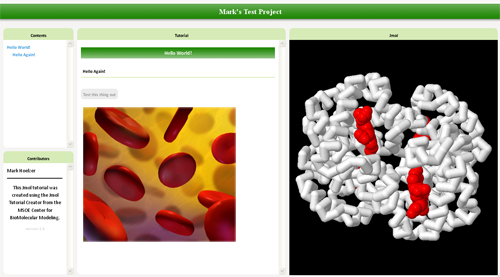
A sample exported Jmol Exploration
At any point in the design process, you can test your Jmol Exploration to see how it will look and function in its final exported form by using the "5. Preview" button in the main navigation. This will open the Exploration in a new window or tab.
Saving and Reloading Your Work
If you are finished with your design and want to create a final HTML file or if you need to save your project for future work, you can click on the "6. Save" button in the main navigation. This will initiate a download of your Jmol Exploration as an .HTML file.
Your saved .HTML file will allow you to reload your project directly into the Jmol Exploration Design Environment for future editing. To reload a previously saved project, simply return to the Jmol Exploration Creator Home Page and click the "Edit a Previously Created Jmol Exploration". Select your saved document and click "Submit".